Wednesday, July 28, 2010

Elderberry Cordial--The Fatigue Destroyer!

The elderflowers have gone, ripening into little black berries.


Some internet research has revealed that the tree in MB's garden is a Blue Elder, distinctive for the dusty bloom on each little berry.  I have been wanting to make a cordial with the berries since we gave MB the tree two summers ago.  It sounds so old-fashioned, like something Anne would intoxicate Diana with, and also healthy--this past winter, I drank a few drops of Neal's Yards Remedies Echinacea and Elderflower tincture every night to ward off H1N1 and other sicknesses.


After preserving the peaches, we had quite a bit of leftover sugar syrup (hopefully you won't!  I adjusted the recipe after our trials), so, I figured the time had come to make my own elderberry cordial.  There are many recipes to be found for elderberries--wines, syrups, cordials.  All involve sugar and elderberries, some involve alcohol as a preservative.  Google Books has many nineteenth and twentieth century cook books, and all text searchable.  With so many varieties of recipes, I was not sure which to choose.

In The Art and Mystery of Making British Wines &c of 1865, the author offers three recipes for Elderberry wine, the third method seemed the best.


Admired by the best judges of wine!  But I don't really want to make wine, so elderberry syrup it would be.


A quick search of more recent recipes revealed that the basics have not changed much since Sir Thomas Browne set out to debunk the myth that elderberries were poisonous in his Pseudodoxia Epidemica or, Enquiries into very many received tenents, and commonly presumed truths.


Ok, here's just one last old recipe (I can't help myself!  I am a historian after all).
 
From Mary Kettlilby's A Collection of above three hundred receipts in cookery, physick, and surgery: for the use of all good wives, tender mothers, and careful nurses from 1734. 


Good-wife and careful nurse that I am, I want to have my elderberry cordial on hand for all cases of the gout (caused by my cooking I have no doubt).


So, as I was saying, elderberry cordial is some combination of elderberries, sugar and alcohol (either added or created by fermentation).  Here's my recipe.


Elderberry cordial
Makes approximately 2 quarts
Takes 1 hour

10 cups elderberries, carefully removed from stems and rinsed
2 cups sugar syrup (or 2 cups sugar and 2 cups water)
4 cups best quality brandy (I don't really know what that is--I used Paul Masson Brandy)

In a medium saucepan on medium heat, cook elderberries for 20 minutes.  Strain through a fine mesh sieve or cheese cloth to squeeze out all juices.  Should yield 2 cups of elderberry juice.  Bring to a simmer with sugar syrup or the sugar and water (if sugar and water, cook until slightly reduced, 10 minutes).  When cool add brandy.  Store in clean bottles.

For vim and vigour, drink 2 ounces dissolved in one glass water each night daily.  Also good with gin, or on its own over ice.

Update: Over Christmas, we drank the elderberry cordial with champagne.  Delicious! (HiH) 

Sunday, July 25, 2010

Gluten-Free Fame


Dear Readers,

There is a new label on the site in honor of friend and blog-reader Olivia of eating (nearly) everything.  She posted a post on her mom making my summer puttanesca recipe with gluten-free pasta!  I love hearing about people trying my recipes, so if you have, please let me know.

The new label is gluten-free, and looking over my recipes, I've noticed that there are quite a few posts that qualify.  These include rice dishes, vegetables, soups and desserts.  I will also include pasta recipes because it is becoming increasingly easy to find gluten-free pastas made of rice, quinoa and even lentils.  Like my vegan tag, it's more about recipes that are easily adaptable, rather than the ingredients being strictly wheat-free.

If you have thoughts on tagging, or adapting recipes to your eating needs, post a comment!

Happy Eating!!!

Thursday, July 22, 2010

Adventures in Home Preserving: Peaches in Syrup

It has been an amazing summer for stone fruit this year, and we've been enjoying so many cherries, plums and peaches.  I swear I am going to post a recipe for vegan cherry pie soon!  In the meantime, here's a look at some peach canning that happened last weekend.

Last summer, I made brandied peaches, following a recipe from the New York Times in 1951, adapted according to the most up-to-date canning knowledge by Eugenia Bone.  It was my first experiment in home preserving, and they came out beautifully--we enjoyed the peaches throughout the winter.

This summer, my roommate and I decided to try again.  I love peaches, and I wanted a simple recipe that would just showcase the deliciousness of ripe summer fruit.  We bought 20 pounds of peaches from Blossom Bluff Orchards at the Farmers Market (I like to do a lot at once, no a couple jars at a time for me!).  We adapted a couple of recipes to our own purposes, and I have posted our method below.  We'll let you know how the peaches turn out!  At least they look beautiful!


Warning - must pay attention to safely preserve.  If the jars are not properly sealed, botulism can grow in them.  You will know if your peaches go bad because the seal will not have held, and as I understand, the fruit will smell bad.  I don't know from experience because I don't have much.  Practice safe canning, ok?

This recipe has many steps, but none of them are difficult, read them all before you begin.  Invite friends.

Peaches in Syrup
Makes 12 pints of peaches
Takes 3 to 4 hours

approximately 20 to 24 firm-ripe and large peaches (8 to 10 pounds)
8 cups sugar

You will need 3 large pots of water, a wire rack to fit inside the pots, 12 pint jars, lids and bands.


In two large pots, deep enough so that the pint jars can sit on the wire rack and be fully covered in water, bring a lot of water to a boil.  Will take time, so go ahead with other steps as the water comes to a full boil.

Mark an x on the tip end of each peach to help with the peeling.  Scald the peaches for 30 seconds each in a different large pot of boiling water.  Here is a before and after shot of the peaches.


Let cool on a baking tray.  When cool enough to handle, peel away the skin, pit the peach, and cut into fourths.  Remove any bruised and brown parts.  Place peach pieces in scalded jars*, 1 and a half to two peaches per jar.


Meanwhile, in a medium sauce pan bring the sugar and 8 cups of water to a boil, and let cook for about 10 minutes, or until the syrup has thickened to the consistency of maple syrup.  


It's a lot of sugar!
Fill the jars with the sugar syrup, leaving 1/4 inch of room at the top.  At this stage you can add spices to the jars, we put crushed cardamom pods (one per jar) in some, a small spring of rosemary in others.  Using a chopstick, make sure there are no air bubbles trapped under the fruit pieces.  Wipe the mouths of the jars with a clean cloth, cover with the lids, and screw the bands on until tight.

When the water has come to a boil, gently lower your jars into the water.  Beginning your timer when the water returns to a boil (this may take time), process peaches for 25 minutes.  Make sure they are covered with water the entire time.  Remove the jars from the water and let cool.  You will hear them *pop!* as they seal.


*  To scald the jars: since you will process the peaches for more than 10 minutes, you do not need to sterilize the jars.  Instead, when your water for processing comes to a boil, dip the bottles for just a few seconds each into the water, remove and keep them waiting.  Do the same for the rings.  And when the water is at a simmer (either lower the temperature, or the temperature will lower as you scald the jars), simmer the lids so that the bands soften.

Eugenia Bone's website is a great resource for preservation advice.  She is very cautious, and clear in her instructions.

Wednesday, July 14, 2010

I did it!


In an earlier blog post, I took photographs of an elderflower tree among other delights of a garden in summertime.  A couple of readers wrote in asking for elderflower recipes, and one, faithful reader and superlatively talented Vanessa Davis, pointed the way to a recipe for elderflower fritters.  I had no idea!  And everyone knows about making elderflower fritters--David Leibovitz includedWhere have I been?

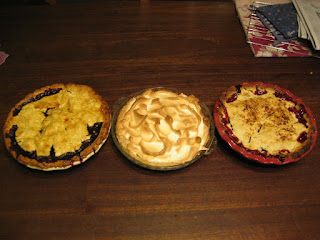
Over the fourth of July, I was determined to make some, but a couple of pies, a paella on the grill, paneer tikkas, and scores of bugs, wore me out.


Pie recipes coming soon!


We went back to Santa Clara this past weekend, and I took the plunge, and fried some elderflowers.


I have to say, they weren't amazing.  I am not a good fryer, and I think my oil was not hot enough, or my batter was too thin.


Something!  I'll work on the recipe again next summer.  I do know how to de-bug the flowers now.  Soak them in a bowl of water, then rinse gently but firmly.  Finally, using a skewer or chopstick, gently fish out the bugs from the dense flower clusters.


They were beautiful though.

Saturday, July 10, 2010

Caution: Extremely delicious, briny pasta ahead


I wasn't sure if I should post this recipe, since I just read that 9/10 Americans eat too much salt.  But this pasta is too good, tangy without being overwhelming.  And readers, just go the rest of the day without any salt, ok?

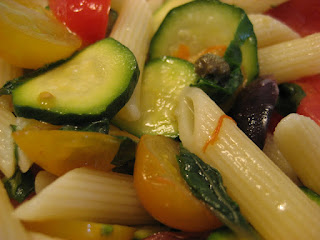
This is a recipe from the Food Network (I think through my friend Jorj), that I have been making for years.  It calls for canned tomatoes, but I thought with all the beautiful little yellow and red tomatoes coming out at the farmers market, I would try it with the fresh things.  This is the perfect pasta for the summertime.  It's eaten cool, it has fresh yummy zucchini in it, and all the briny goodness of olives, capers and lemon juice.  And, it's even better the next day!


The vegetables marinate in the lemon juice so that the tomatoes get all soft and juicy and the zucchini has this really nice crunch.

A word of warning, the Mario Batali recipe this is based on is way too salty, he calls for 2 tablespoons of salt, and when I stick to that recipe, it's often a salty disaster.  So even if you make his version with the can of tomatoes (it is also delicious!), keep the salt to the 1/2 tablespoon I have listed below.


Summer Pasta Puttanesca
Adapted from a Mario Batali recipe
Makes 4 servings
Takes 30 minutes (plus a couple of hours of sitting)

2 young zucchinis, sliced thin
2 cups tiny tomatoes, halved
2 cloves garlic, smashed
2 Tbsp. capers, rinsed
10 kalamata olives, pitted and halved
Juice of 1/2 lemon
Leaves from 2 to 3 stems of basil
1/2 Tbsp. salt
Pepper
2 Tbsp. Olive oil
1/2 box of pasta
Red chili pepper flakes

Combine the zucchini, tomatoes, garlic, capers, olives, lemon juice, basil, salt, pepper and olive oil in a large bowl.  Let sit for 2 hours, or up to over night in the refrigerator.  Make pasta according to directions.  Drain and add to sauce with red chili flakes.  Enjoy!