Showing posts with label farmers markets. Show all posts

Monday, January 14, 2013

Stocking Up!


Happy New Year, dear readers!  I hope you had wonderful holidays and wish you the best for 2013. I made a resolution to blog more regularly, and here's my first step towards making that resolution a reality.  After some time away, I'm back in Halifax.  I had to restock the pantry and the freezer, and for me that meant making some vegetable stock.  It's so great to have on hand to make soups or sauces, and it adds just a little oomph to all those winter vegetable dishes when you swear you will never eat cabbage again! (I always do though).

One afternoon of work makes a freezer full of stock, and really, you can use any vegetables you like.  Best of all, nearly everything I used came from the farmers market, the only exception being the spices and celery. I like stronger onion-ish flavors, so I use both leeks and shallots, but you could just throw one onion in. I don't like carrot to be too overpowering in my stock, but if you love carrots, throw more in!  Mushrooms, potato peels, if it's hanging out in your refrigerator and you like the taste, it can go in stock.

I'm planning on making a faux chicken noodle soup soon, stay tuned!


Vegetable Stock
Makes about 14 cups of stock
Takes 1 hour of active cooking, plus simmering and cooling

4 carrots, chopped
4 celery stalks, chopped
5 leeks, sliced
2 shallots, chopped
2 garlic cloves, smashed
10 twigs of thyme
10 peppercorns
2 cloves
2 bay leaves
10 stalks of parsley
16 cups water

In a large stock pot, heat some olive oil on high heat.  Add carrots, celery, leeks, shallots, garlic, thyme, peppercorns, cloves and bay leaves.  Saute for 10 to 15 minutes or until vegetables are beginning to caramelize.  Add parsley and water.  Bring to a boil, and then reduce heat and simmer, covered, for about 30 minutes.  Let cool, and portion into containers.  Will keep in refrigerator for about 3 days, or in the freezer for a couple of months.

Monday, September 26, 2011

Adventures in Home Preserving: Tomatoes


We've done it!  Our annual push to preserve as much as we can.   We've already done roasted red peppers, cucumber pickles, and we have dilly beans to do this week!

Our big challenge is always tomatoes.  We try to can at least 25 pint jars of tomatoes each year, and this will last us through the winter for pasta sauces, channa masala, and whatever else we can think to make.

Canning is always better with a friend.  It is madness.  It took about 4 hours on two separate occasions this year.  The tomatoes are first peeled and seeded.  Then, we pack them into jars and cover them with the juice recovered from the seeding.  I make sure everything is as clean as it can be to ensure as many jars stay safe as possible.  In three years of canning, we've never had a bad jar.  This year though, some of the jars that we've been reusing broke during processing.  They must have been slightly cracked or something.  It's so sad to see a floating ghost jar in the water!

It can be scary to can.  It's involved and time consuming, and if you don't do it right, you could have a jar of botulism.  But!  You can do it!  With equipment you probably already have in your kitchen or could borrow from a friend.  Just pay attention and take your time.  It is worth it.  You will have the beautiful tomatoes available now at the farmer's market, all winter long.

There are still fresh tomatoes at the market, but soon, we will be so thankful for these jars!


Whole Tomatoes in their Juice
This is the basic recipe that you will find from the USDA or from contemporary canning mavens like Eugenia Bone
Makes 6 pints (~500 ml)
Takes 3 hours

Ingredients
About 15 pounds ripe and firm roma or plum tomatoes, rinsed and clean
citric acid (available in most grocery stores or health food stores)
basil leaves, oregano, or whatever you wish

Equipment
6 pint jars, with new bands and lids
One very large pot--your jars need to be submerged in water and covered by at least an inch.
A metal tray to fit in the bottom of the pan so that the jars do not directly touch the bottom--they will break from rattling around and the heat of the bottom of the pan.
A very good pair of rubberized tongs, or a jar lifter
One large strainer
One pitcher
One smaller pot
Three large bowls
A knife
One chopstick

Fill your very large pot with water and place the tray inside.   Place your jars inside, standing upright, and make sure the water comes over them.  Now you know how many jars will fit in at once.  Ours holds 8.  Maybe you are lucky to have two very big pots and you can have two going at once.  Bring the water to a boil with the lid on.  This will take awhile, and the jars will be sterilized as they sit in the pot.

Fill your smaller pot, big enough to hold 6 or so of the romas comfortably, with water and bring to a boil.

Prepare one of the large bowls as an ice bath.  Get the other bowl ready for peels and seeds by placing the strainer over it.

When the water in the smaller pot is boiling, add the tomatoes, six or so at a time, and cook for 30 seconds or so, just enough to loosen their skins.  Remove them and place in the ice bath.  Keep on doing this until you have gone through all of the tomatoes.

Remove the tomato skins, the cores and any blemishes.  The tomato skins can go into the strainer, throw the cores and bad spots out!  Get your fingers in the cavities and get out all of the seeds and put those into the strainer.  The seeds make the tomatoes bitter, so getting as many of them as you can out is good.  Place the prepared tomato in the third large bowl.

 
Continue doing this until all of the tomatoes are prepared.  When the strainer gets heavy, press down and agitate to get out all of the juice.  Pour the juice into the pitcher.


Remove the jars from the big pot, very carefully draining them, and place them on a clean towel.  Place the bands in the hot water, and put the lids in a heat-safe bowl.

Place 1/4 teaspoon of citric acid in each of the pint jars.  Add basil leaves or what you wish.  I keep my tomatoes simple because I don't know what will happen to them.

Pack the jars with the tomatoes, pressing them down as you do so, until they reach the shoulders of the jars.  Cover the tomatoes with the tomato juice.  Using a chopstick, or a bread knife, poke around the tomatoes until you are sure that there are no air bubbles.  Fill the jars with more juice if necessary so that there is 1/2 inch of room at the top.

Wipe down the tops of the jars with a wet paper towel so that they will make good contact with the lids.  Pour a few ladle-fulls of simmering water onto the lids to soften the rubber bands.  Place them on the jars, and screw the bands on finger tip tight.  It is the lids that create the seal, not the bands, but the bands have to keep the lids on during the processing time.

Now, carefully, so carefully!, place the jars into your canning pot.  Wait for the water to come to a boil again, now start your timer for 40 minutes.  Keep an eye on the pot so that there is always at least an inch of water above the jars.

When it's time, remove the jars, very, very carefully!  Place them on a towel on your counter (not a wooden surface, we have stains from our first attempts).  Now the fun part, they should all pop!  The most satisfying sound, letting you know that your jars have sealed, and you have tomatoes waiting for you.  Let them sit untouched for 12 hours, and check the seals.  They should be concave and not move when you press them down.  Then store them in the dark for up to a year.

Enjoy your labors!!


Saturday, November 20, 2010

I Went Shopping: Thanksgiving at the Halifax Farmers' Market

It's been nearly a month since I last posted!  Don't know how the time has gone by.  Sorry dear readers. Now it is nearly Thanksgiving in America, and there will be so much cooking and picture-taking this week that I hope it makes up for my bad behavior.

Today we went to the Halifax Farmers Market and stocked up for Thanksgiving.

From Elmridge Farms, we bought
Fingerling Potatoes
Multi-colored carrots
A butternut squash
A buttercup squash
Parsley
Parsnips
Yellow Onions
Sweet Potatoes
Celery


We found Brussels Sprouts at the Elmridge Farm Stand, but we are not sure where they came from.


Yukon Gold Potatoes
Yellow Onions
Carrots

Pasture Hill Farm
Leeks
Turkey
Sunchokes

Samosa
Cookies

Square White Loaf
Froment

The mushrooms, hot peppers, green and yellow peppers came from a stand whose name I can't remember.

I am definitely going to be making Gourmet's Vegetarian Shepherd's Pie, which came out so beautifully last year.  I think I will bake a vegan pumpkin pie with coconut milk, and a conventional pecan pie.  And, what I am really looking forward to, I am going to make my own seitan Turkey!

Stay Tuned!

And Happy Holiday Planning!

Thursday, July 22, 2010

Adventures in Home Preserving: Peaches in Syrup

It has been an amazing summer for stone fruit this year, and we've been enjoying so many cherries, plums and peaches.  I swear I am going to post a recipe for vegan cherry pie soon!  In the meantime, here's a look at some peach canning that happened last weekend.

Last summer, I made brandied peaches, following a recipe from the New York Times in 1951, adapted according to the most up-to-date canning knowledge by Eugenia Bone.  It was my first experiment in home preserving, and they came out beautifully--we enjoyed the peaches throughout the winter.

This summer, my roommate and I decided to try again.  I love peaches, and I wanted a simple recipe that would just showcase the deliciousness of ripe summer fruit.  We bought 20 pounds of peaches from Blossom Bluff Orchards at the Farmers Market (I like to do a lot at once, no a couple jars at a time for me!).  We adapted a couple of recipes to our own purposes, and I have posted our method below.  We'll let you know how the peaches turn out!  At least they look beautiful!


Warning - must pay attention to safely preserve.  If the jars are not properly sealed, botulism can grow in them.  You will know if your peaches go bad because the seal will not have held, and as I understand, the fruit will smell bad.  I don't know from experience because I don't have much.  Practice safe canning, ok?

This recipe has many steps, but none of them are difficult, read them all before you begin.  Invite friends.

Peaches in Syrup
Makes 12 pints of peaches
Takes 3 to 4 hours

approximately 20 to 24 firm-ripe and large peaches (8 to 10 pounds)
8 cups sugar

You will need 3 large pots of water, a wire rack to fit inside the pots, 12 pint jars, lids and bands.


In two large pots, deep enough so that the pint jars can sit on the wire rack and be fully covered in water, bring a lot of water to a boil.  Will take time, so go ahead with other steps as the water comes to a full boil.

Mark an x on the tip end of each peach to help with the peeling.  Scald the peaches for 30 seconds each in a different large pot of boiling water.  Here is a before and after shot of the peaches.


Let cool on a baking tray.  When cool enough to handle, peel away the skin, pit the peach, and cut into fourths.  Remove any bruised and brown parts.  Place peach pieces in scalded jars*, 1 and a half to two peaches per jar.


Meanwhile, in a medium sauce pan bring the sugar and 8 cups of water to a boil, and let cook for about 10 minutes, or until the syrup has thickened to the consistency of maple syrup.  


It's a lot of sugar!
Fill the jars with the sugar syrup, leaving 1/4 inch of room at the top.  At this stage you can add spices to the jars, we put crushed cardamom pods (one per jar) in some, a small spring of rosemary in others.  Using a chopstick, make sure there are no air bubbles trapped under the fruit pieces.  Wipe the mouths of the jars with a clean cloth, cover with the lids, and screw the bands on until tight.

When the water has come to a boil, gently lower your jars into the water.  Beginning your timer when the water returns to a boil (this may take time), process peaches for 25 minutes.  Make sure they are covered with water the entire time.  Remove the jars from the water and let cool.  You will hear them *pop!* as they seal.


*  To scald the jars: since you will process the peaches for more than 10 minutes, you do not need to sterilize the jars.  Instead, when your water for processing comes to a boil, dip the bottles for just a few seconds each into the water, remove and keep them waiting.  Do the same for the rings.  And when the water is at a simmer (either lower the temperature, or the temperature will lower as you scald the jars), simmer the lids so that the bands soften.

Eugenia Bone's website is a great resource for preservation advice.  She is very cautious, and clear in her instructions.

Saturday, July 10, 2010

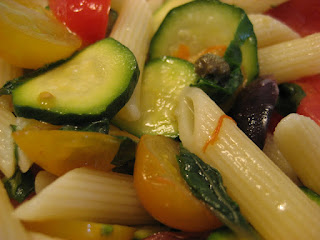
Caution: Extremely delicious, briny pasta ahead


I wasn't sure if I should post this recipe, since I just read that 9/10 Americans eat too much salt.  But this pasta is too good, tangy without being overwhelming.  And readers, just go the rest of the day without any salt, ok?

This is a recipe from the Food Network (I think through my friend Jorj), that I have been making for years.  It calls for canned tomatoes, but I thought with all the beautiful little yellow and red tomatoes coming out at the farmers market, I would try it with the fresh things.  This is the perfect pasta for the summertime.  It's eaten cool, it has fresh yummy zucchini in it, and all the briny goodness of olives, capers and lemon juice.  And, it's even better the next day!


The vegetables marinate in the lemon juice so that the tomatoes get all soft and juicy and the zucchini has this really nice crunch.

A word of warning, the Mario Batali recipe this is based on is way too salty, he calls for 2 tablespoons of salt, and when I stick to that recipe, it's often a salty disaster.  So even if you make his version with the can of tomatoes (it is also delicious!), keep the salt to the 1/2 tablespoon I have listed below.


Summer Pasta Puttanesca
Adapted from a Mario Batali recipe
Makes 4 servings
Takes 30 minutes (plus a couple of hours of sitting)

2 young zucchinis, sliced thin
2 cups tiny tomatoes, halved
2 cloves garlic, smashed
2 Tbsp. capers, rinsed
10 kalamata olives, pitted and halved
Juice of 1/2 lemon
Leaves from 2 to 3 stems of basil
1/2 Tbsp. salt
Pepper
2 Tbsp. Olive oil
1/2 box of pasta
Red chili pepper flakes

Combine the zucchini, tomatoes, garlic, capers, olives, lemon juice, basil, salt, pepper and olive oil in a large bowl.  Let sit for 2 hours, or up to over night in the refrigerator.  Make pasta according to directions.  Drain and add to sauce with red chili flakes.  Enjoy!


Wednesday, June 30, 2010

Pasta with Morels and Peas

It's morel season!  The markets around Berkeley have had them for the past few weeks, and we've eaten three versions of this simple pasta.  The first time with asparagus, the second time with morels only, and today, with young peas.

What's wonderful about this recipe is that the vegetables cook for the same amount of time as the pasta!  So start the 'sauce' immediately after you put the pasta in the water.

Pasta with Morels and Peas
Makes 2 servings
Takes 1 hour

1/3 pound of pasta
2 cloves garlic sliced
1/4 cup shallot, minced
1.6 ounces of fresh morels (about 1/10 of a pound)
an equal amount of trimmed peas (about 1 cup)
salt
pepper
Heat salted water for pasta.  When it comes to a boil, add pasta.

In a large saute pan on medium high heat, saute garlic and shallot for 1 minute.  Add morels, spread them around the pan, and let sizzle for about 4 minutes.  Stir, and once they are evenly spread around the pan again, let sizzle for 4 minutes more.  Add 5 grinds of pepper and peas, and saute for 2 minutes.  Add 1/4 cup pasta water.

Drain pasta reserving 3/4 cup of pasta water.  Add pasta to the pan, stirring to combine.  Add 3/4 cup pasta water, and let cook a few minutes more.

We ate our pasta with roasted torpedo onions (425 degrees for about 20 minutes).  They were really sweet and delicious (if you cut a small x into one of the ends, they won't burst while cooking).

Hurry while there are still morels to be had!

Wednesday, January 27, 2010

Quinoa Salad with Radicchio, Rutabaga and Hazelnuts

A while ago, a friend pointed me towards a recipe in the New York Times that used farro and rutabaga.  I'm a huge fan of farro, I like to mix it in with rice to add texture, and love it in salads.  This was the perfect recipe for me to try since it incorporates a lot of flavors I already like, and a big new one, rutabagas.  I had been wary of them because I don't love sweet starchy vegetables; I am very particular about squashes and sweet potatoes.  But there are so many rutabaga enthusiasts out there!  Have you noticed this too, readers?

I decided it was time to try the rutabaga when last week, they were the answer to a question on Jeopardy! (a question to the answer?), and I found them at the farmer's market.  For a gathering of ladies to taste wines from Chile, I adapted the salad to use quinoa, a grain from the Andes, and added radicchio as a complement to the sweetness of the rutabaga.   This salad was really delicious and felt healthy and had a good variety of flavors and textures.

I recommend having a large sieve to make handling the quinoa infinitely easier.  If you don't have one, do not fret.  You will probably lose lots of grains in the rinsing, and hopefully you have a large metal bowl and very big pot for the steaming.  In the end it's worth it as the quinoa has a great fluffy yet crunchy texture.

Quinoa Salad with Radicchio, Rutabaga and Hazelnuts
Takes 1 hour
Makes 8 servings

1 medium to large rutabaga, peeled and cut into 1/2-inch pieces (not too large, as the farmer told me they get hard and fibrous)
extra virgin olive oil
fine sea salt
Freshly ground black pepper
1 1/2 cups red quinoa
2 tablespoons finely chopped shallot (1/2 of a large shallot)
4 teaspoons sherry vinegar
1 fat garlic clove, minced
1 head of radicchio, sliced thinly
1/2 cup toasted, chopped hazelnuts

Preheat oven to 375 degrees.

Toss rutabaga with olive oil, salt and pepper to taste. Spread out on a baking sheet and roast, stirring once or twice, until rutabaga is very tender and browned, 25 to 30 minutes.

Meanwhile, bring salted water to boil in a large pot.  Rinse quinoa in 5 washes of water, each time shaking it around in the bowl, letting it settle, and then cupping the quinoa while you let the water pour out.  The quinoa is often dusty (not usual dust, but its own powdery residue), and can sometimes have small stones in it.  This is a step which is very helpful with a a sieve.  When the water is boiling add quinoa and cook for 10 minutes.

In a large bowl, whisk together the shallot, vinegar, garlic and 1/4 teaspoon salt. Whisk in 3 tablespoons olive oil and some pepper.

Drain the quinoa in a large seive (or very very carefully with the help of a large spoon.  Rinse with cold water.  Return the pot to the stove and fill with an inch of water, bring to a simmer, and balance the sieve of quinoa in the pot (so it isn't touching the bottom), cover with a kitchen towl and a lid, and steam for 10 minutes.  If you do not have a sieve, place the quinoa in a metal bowl in the simmering pot, cover with the towel and the pot with the lid, and steam for 10 minutes.  I had to use a roasting pan to fit our smallest metal mixing bowl!

Add the quinoa to the bowl with the salad dressing, and once it has cooled a little, add the radicchio, the rutabaga and the hazelnuts.  Mix together.  Taste and add vinegar, salt and pepper to your liking.

This salad keeps really well, the quinoa grains hold their texture and nothing gets too soggy.  But don't wait too long to eat it!


Sunday, December 20, 2009

One last London picture


A scene from Borough Market.  Went there yesterday for some coffee and mulled cider.  Everyone is getting ready for the holidays.

Wednesday, October 14, 2009

Thanksgiving in PEI


We took advantage of the thanksgiving long weekend to visit Prince Edward Island, a charming land of farms and sea coast. In exchange for playing 36 holes of golf, my boyfriend agreed we would visit Anne. I loved the books as a young girl, and have always wanted to visit. L. M. Montgomery wrote with such affection and real knowledge of PEI, that the island was as much of a character as Diana or Gilbert.

And so we saw Green Gables.

But we really fell in love with the food.


Our first stop was the Charlottetown farmer's market, where we debated whether or not to buy our weekly produce. There was a good variety, and lots of preserves, in addition to beautiful leather work, baskets, and other crafts. There were also a lot of food stalls. We wanted to have lunch in Charlottetown, so we decided not to eat at the market. BUT, we did have some amazing little doughnuts, hot now from a tiny machine!


They were so good, I was afraid they had been fried in lard. And also too afraid that I wouldn't be able to eat them to ask!

Our next meal was eh, at the Merchantman Pub in Charlottetown. All of the local produce pamphlets had included it as one of the restaurants on the island that really stressed local, fresh seasonal ingredients. The very nice red peppers did not make up for the fact that my veggie tacos were actually a burrito and not very flavorful. It was good not great.

Especially in retrospect since we had one of our favorite meals anywhere in the maritimes that night at the Pearl Cafe. PEI is trying to develop agro-tourism, stressing the number of local family farms and the availability of great produce and meat. The Pearl is one of the restaurants that I had heard about as participating in farm-to-table type cuisine. The Pearl is between Cavendish (Anne-town) and North Rustico, the major cluster of businesses on the north shore (this means, 10 businesses all spreading out from a single intersection! PEI is tiny!). It's in a gorgeous building, I heard it was a converted woodshop.

It was so beautifully decorated. Exposed beams, wood paneling, and just really nice details. Like this pretty lamp.

It was too dark to take pictures of the food or any of the other parts of the restaurant. But I will tell you a little about what we ate. It was thanksgiving, and Paddy had his first of two turkey dinners that weekend. This one had turkey and stuffing and gravy. And they were so nice to replace the creamy mashed potatoes with these delectable fried potato puffs. And there was kale and carrots, and really delicious pickled pearl onions.

I had really yummy parsnip and carrot "pasta" in a walnut pesto, that came inside a wee pumpkin. And kale on the side. By itself, it was pretty good, but adding paddy's potatoes and pickled onions made it the best veggie plate I've had in the maritimes. And then there was apple cobbler and a pistachio praline for dessert. YUM!

We also ate really well at the B&B where we stayed, the Beach House Inn. Waffles one day, poached eggs the next, and bacon at every breakfast for Paddy.

Our other great meal was at the Dunes Gallery and Cafe.

It was the last day of their season, and they had a special three course lunch to benefit an organization that put PEI farmers in touch with Kenyan farmers, and arranged exchanges between children in both places. Everywhere we went, we heard locals bemoaning the decline of agriculture in the province. I hope the farms survive, because they make amazing foods.

At the Dunes, Paddy had turkey soup to start, and I had an amazing plate of little salads. A beet and goat cheese "slaw," an amazing panzanella with tiny tomatoes, some quick pickled cauliflower, a couscous salad with peas and raisins, all topped by a big pile of really good sprouts. So many yummy tastes!

Our main courses were steak for paddy, and swiss chard polenta with a tomato and mushroom sauce.

Our desserts were sooooooo good. Very simple, an apple cobbler and a blueberry cobbler. But both were so fruitastically tasty. I would go back just for them.

We ate so well, we had to take a long walk along the shore to get ready for Paddy's second thanksgiving dinner.


Thank you Prince Edward Island!!! For giving us Anne and delicious foods. Next year we'd like to invite you all to visit PEI for thanksgiving weekend with us and enjoy lots and lots of turkey dinners. Paddy has a list of at least 5 places we didn't get a chance to go.