Showing posts with label promises promises. Show all posts

Friday, January 28, 2011

TGiPho!


Readers, I don't know why I haven't made Pho before. I love the fragrant soup, the drama of adding toppings to your bowls, fixing the spiciness with green chilies and siracha sauce. It's hard to find vegetarian pho, at many Vietnamese restaurants, their vegetarian option is a version of Tom Yum, spicy and sour and delicious, but I end up jealous of my meat-eating friends and their bowls that smell of cinnamon and ginger and star anise.


In the Bay Area you can find several vegetarian vietnamese restaurants, and my favorite is Tofoo Com Chay in San Jose.   I think the owners of these restaurants are followers of Supreme Master Ching Hai and her message of veganism and climate responsibility.  Supreme Master fliers are on hand in the restaurant--I particularly like the messages from the animals.


This recipe makes enough broth for 8 servings of pho.  Or you could do what I did, have some that night, and save the broth in the freezer for 6 more bowls of pho! 

It's a very simple broth that can be adapted in your bowls.  Top it as you like, with more or less chilies and vegetables and herbs.  We can't find many of the garnishes provided in California pho shops like Thai Basil or culantro, so we just use cilantro and mint.  The first night I made the pho, we had tofu, the second we used my victory seitan. We found some pea sprouts at the local grocery, and that was really good.  Anything goes!


An added bonus: our house smelled amazing while the broth was simmering!

Vegetarian Pho
Makes 8 servings
Takes 1 (busy) hour

For Broth
2 medium onions
1 4-inch piece of ginger
1 cinnamon stick
5-6 stars of anise
6 cloves

For Bowls
Steamed cabbage
Noodles
Bean sprouts
Pea sprouts
Sliced shallots
Sliced green onions
Tofu
Cilantro
Mint
Green Chilis
Lime

In the broiler or on the stove, char the onions and garlic until the skins are mostly blackened.  Let cool.


In a large pot, on medium heat, toast the cinnamon, star anise and cloves until they are very toasty and fragrant (do not burn!).  Add 10 cups of water, and bring to a boil on medium high heat.

Meanwhile, your ginger and onions should be cool.  Peel the onions and ginger, and then rinse them under water to remove all the charred bits.  Chop coarsely and add to the pot.  When the pot comes to a boil, turn the heat down to simmer, cover and simmer gently for 30 minutes.

While that is happening you can prep your ingredients for the bowls.  For the noodles, place the dry noodles in a large heat-proof bowl and cover with bowling water.  Cover the bowl and let steep for 20 minutes.  This should be enough to cook the noodles, but gently simmer them for 5 to 10 minutes more if they are not cooked.

I like to cut my tofu into blocks and saute them on medium heat until golden on all sides.  I then cut them into little rectangles.


Thinly slice shallots and green onions, green chilies.  You can't see it in any of the pictures, but I gently steamed some cabbage for our pho as well.
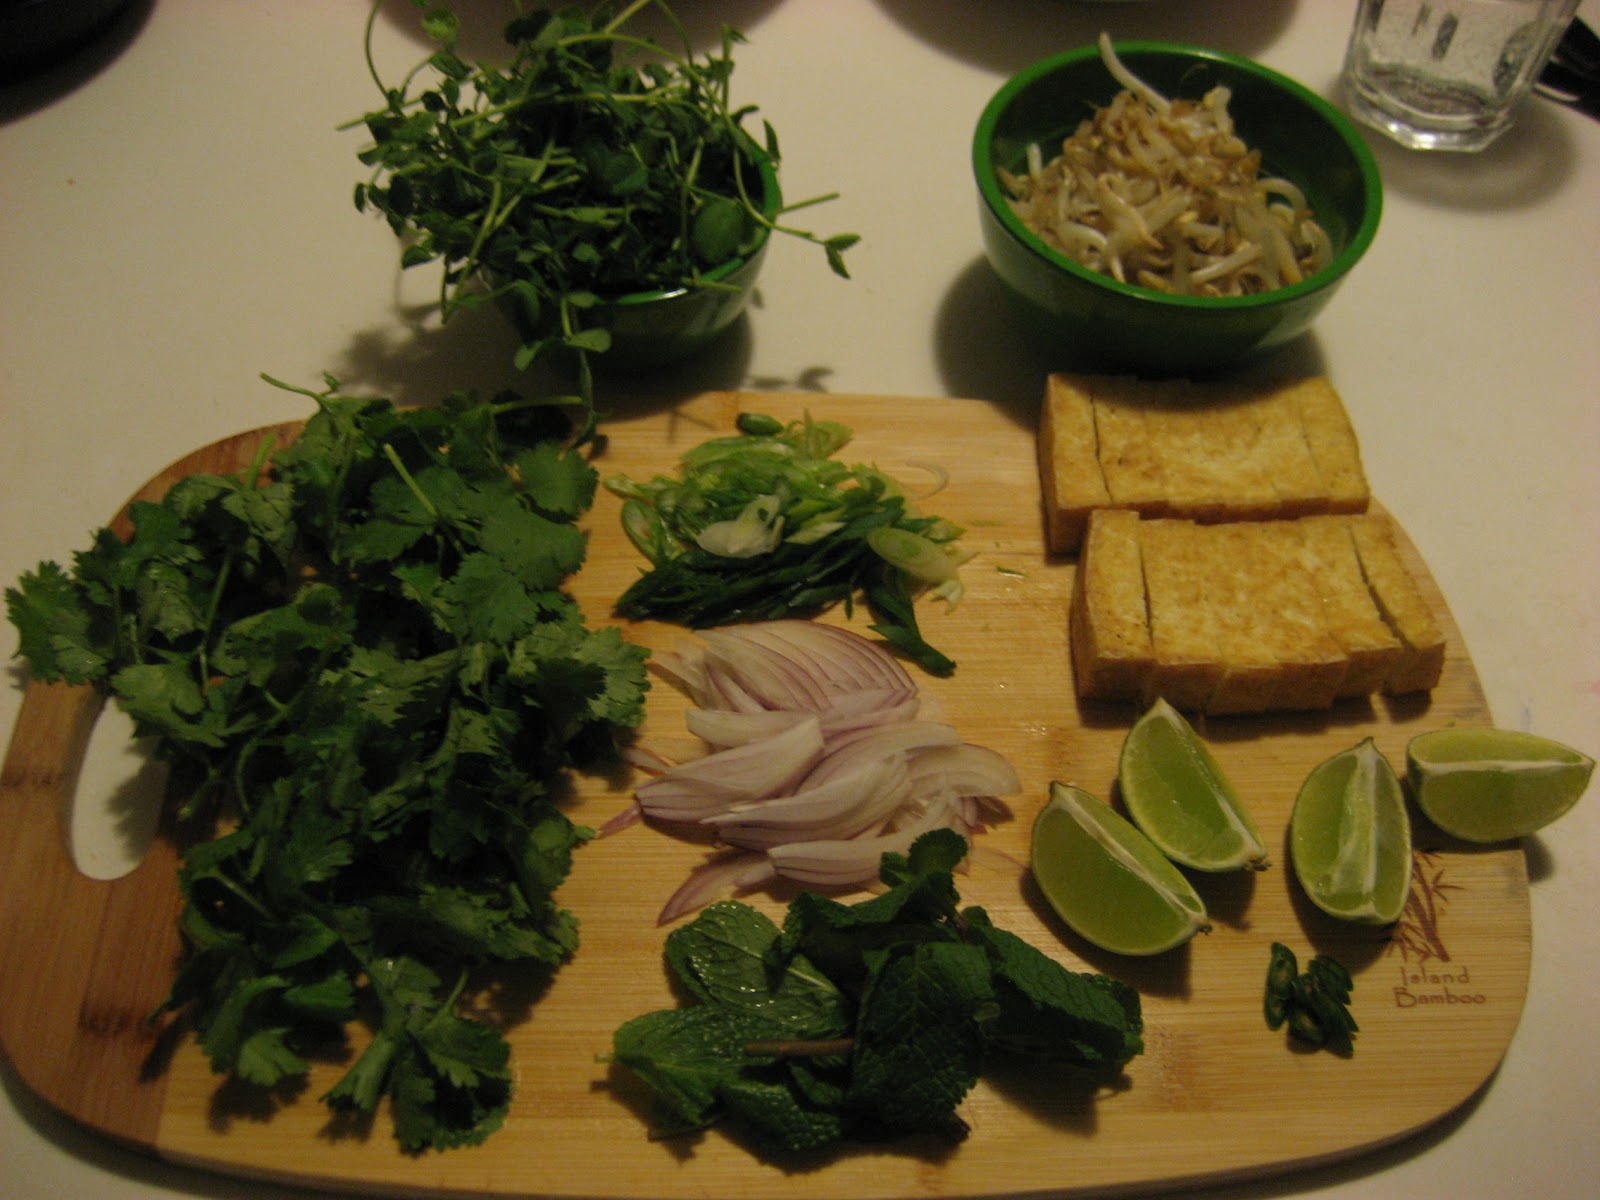

By this time your broth should be ready.  Uncover the pot and take in the amazing smell.  Drain, very carefully, it's a big pot of hot liquid! Return the broth to very low heat and add 1 Tablespoon of salt.  Keep it warm, assemble your bowls.


Check the saltiness of the broth and add as much more salt as you like.  You can later add soy sauce or hoisin sauce to the individual bowls.  Pour into the bowls and enjoy! 

Thanks ladies!

Wednesday, December 8, 2010

Green Beans Paruppu usili

This recipe is especially for my friend Adrianne.  This past summer, I had the great pleasure of swapping banana flower recipes with her and another friend.  In South India it is common to eat banana flowers sauteed with paruppu usili, steamed lentil cakes, broken up into small pieces.  She will have to give us the recipe for her banana flowers in coconut milk from the Philippines (and also for mango salad, please!), but here is a recipe for paruppu usili, which she specially requested.

In the kitchens of my family, paruppu usili is added to vegetables when the main soupy dish of the day doesn't have lentils in it.  We usually eat Rasam or Sambhar, which are made with lentils, but when we have Mor Kuzhambu or Milagu Rasam or Vatha Kuzhambu, none of which have lentils in them, we put the lentils into the vegetables!  Vegetarian meal planning!

When the professor brought home some pretty green beans from the grocery store the other night, I knew it was finally time to write up the recipe for Adrianne.  Sorry it took me so long!


Green Beans Paruppu usili
Makes 6 servings
Takes 45 minutes

1 cup toor dal
3 dried red chilis
1/2 tsp. salt
1 tsp. mustard seeds
1 dash asofetida
fresh or dried curry leaves, if available
1 pound green beans, ends cut off, and chopped into tiny slices
1/4 tsp. turmeric

Soak the toor dal for 1 hour.  Drain but reserve the water.  In a blender or food processor, grind the lentils, chilis and salt to a chunky paste, adding water as necessary.

Make little patties from the lentil paste and steam in a steamer set over boiling water.  I don't have one, so I used a strainer, making sure the water was below the basket.  

Steam for 15 minutes, or until the paruppu usili is firm and not sticky when you touch it.  Set it aside to cool, and when you can handle it, break it up into smaller pieces.
Heat vegetable or canola oil in a saute pan on medium high heat.  When it's hot, add the broken up paruppu usili, sauteing until the pieces are further broken up and nicely browned.  Set the parruppusili aside, and return the saute pan to the heat.

Add more oil, and when it's hot, add the mustard seeds.  When they begin to splutter, add the asofetida and the curry leaves.  Stir around quickly, for just a few seconds, and then add the green beans, turmeric, and salt to taste.  Saute until well combined, add about 1/4 cup of water, put a lid on it, and let cook for about 10 minutes.  Check on it, because if you've cut the beans small, they will cook very quickly.  When they are just about done, add the paruppu usili back to the pan, and stir it all around, cooking a few minutes more.

We ate the Green Beans Paruppu usili with carrot salad and some Milagu Rasam.  So good!  My favorite combination is green beans and lemon rasam, the meal I would always ask for my first night home from college.


Thursday, July 22, 2010

Adventures in Home Preserving: Peaches in Syrup

It has been an amazing summer for stone fruit this year, and we've been enjoying so many cherries, plums and peaches.  I swear I am going to post a recipe for vegan cherry pie soon!  In the meantime, here's a look at some peach canning that happened last weekend.

Last summer, I made brandied peaches, following a recipe from the New York Times in 1951, adapted according to the most up-to-date canning knowledge by Eugenia Bone.  It was my first experiment in home preserving, and they came out beautifully--we enjoyed the peaches throughout the winter.

This summer, my roommate and I decided to try again.  I love peaches, and I wanted a simple recipe that would just showcase the deliciousness of ripe summer fruit.  We bought 20 pounds of peaches from Blossom Bluff Orchards at the Farmers Market (I like to do a lot at once, no a couple jars at a time for me!).  We adapted a couple of recipes to our own purposes, and I have posted our method below.  We'll let you know how the peaches turn out!  At least they look beautiful!


Warning - must pay attention to safely preserve.  If the jars are not properly sealed, botulism can grow in them.  You will know if your peaches go bad because the seal will not have held, and as I understand, the fruit will smell bad.  I don't know from experience because I don't have much.  Practice safe canning, ok?

This recipe has many steps, but none of them are difficult, read them all before you begin.  Invite friends.

Peaches in Syrup
Makes 12 pints of peaches
Takes 3 to 4 hours

approximately 20 to 24 firm-ripe and large peaches (8 to 10 pounds)
8 cups sugar

You will need 3 large pots of water, a wire rack to fit inside the pots, 12 pint jars, lids and bands.


In two large pots, deep enough so that the pint jars can sit on the wire rack and be fully covered in water, bring a lot of water to a boil.  Will take time, so go ahead with other steps as the water comes to a full boil.

Mark an x on the tip end of each peach to help with the peeling.  Scald the peaches for 30 seconds each in a different large pot of boiling water.  Here is a before and after shot of the peaches.


Let cool on a baking tray.  When cool enough to handle, peel away the skin, pit the peach, and cut into fourths.  Remove any bruised and brown parts.  Place peach pieces in scalded jars*, 1 and a half to two peaches per jar.


Meanwhile, in a medium sauce pan bring the sugar and 8 cups of water to a boil, and let cook for about 10 minutes, or until the syrup has thickened to the consistency of maple syrup.  


It's a lot of sugar!
Fill the jars with the sugar syrup, leaving 1/4 inch of room at the top.  At this stage you can add spices to the jars, we put crushed cardamom pods (one per jar) in some, a small spring of rosemary in others.  Using a chopstick, make sure there are no air bubbles trapped under the fruit pieces.  Wipe the mouths of the jars with a clean cloth, cover with the lids, and screw the bands on until tight.

When the water has come to a boil, gently lower your jars into the water.  Beginning your timer when the water returns to a boil (this may take time), process peaches for 25 minutes.  Make sure they are covered with water the entire time.  Remove the jars from the water and let cool.  You will hear them *pop!* as they seal.


*  To scald the jars: since you will process the peaches for more than 10 minutes, you do not need to sterilize the jars.  Instead, when your water for processing comes to a boil, dip the bottles for just a few seconds each into the water, remove and keep them waiting.  Do the same for the rings.  And when the water is at a simmer (either lower the temperature, or the temperature will lower as you scald the jars), simmer the lids so that the bands soften.

Eugenia Bone's website is a great resource for preservation advice.  She is very cautious, and clear in her instructions.

Wednesday, July 14, 2010

I did it!


In an earlier blog post, I took photographs of an elderflower tree among other delights of a garden in summertime.  A couple of readers wrote in asking for elderflower recipes, and one, faithful reader and superlatively talented Vanessa Davis, pointed the way to a recipe for elderflower fritters.  I had no idea!  And everyone knows about making elderflower fritters--David Leibovitz includedWhere have I been?

Over the fourth of July, I was determined to make some, but a couple of pies, a paella on the grill, paneer tikkas, and scores of bugs, wore me out.


Pie recipes coming soon!


We went back to Santa Clara this past weekend, and I took the plunge, and fried some elderflowers.


I have to say, they weren't amazing.  I am not a good fryer, and I think my oil was not hot enough, or my batter was too thin.


Something!  I'll work on the recipe again next summer.  I do know how to de-bug the flowers now.  Soak them in a bowl of water, then rinse gently but firmly.  Finally, using a skewer or chopstick, gently fish out the bugs from the dense flower clusters.


They were beautiful though.

Friday, March 19, 2010

John Makes Chicken


Sorry for such a long break between posts!  It's been a long month, and I've been so bad about taking pictures of food!  So here is a picture of John's beautiful chicken.  He's been in a new kitchen, new equipment, and had been sad not to get his chicken breasts the right crunchy skin soft inside (or whatever you say about meat) balance, and he was so proud of this attempt, I promised I would share it on my blog.  Here it is!

Also, hope you are all following the cake v. pie tournament on jezebel.  

 
Go pie go!

Promise, cooking up all kinds of posts to be available soon.